The Better Way to Import Your Excel Data Into Quickbase
- Juiced Technologies Inc.

- Jul 12, 2022
- 2 min read
The days of worrying about how the fields will be "lined up" in your application as with the standard Quickbase import process are behind you.

We know what you're thinking: "Juiced!! I've been waiting for this functionality all my life! I NEED it. But how? HOW can I get it?"
We're glad you asked! It's quite simple, really. We are happy to introduce you to....
EZ File Importer
Our EZ File Importer add-on allows you to import data from any Excel based spreadsheet into one or many table(s) in Quickbase and have them look identical to one another.

All you do is define an import configuration for each table you need to import into, (don't worry, these can be saved and used over and over again), then upload a file to a record in an import table, click “save”, and the import occurs automatically according to your field mappings defined in your import configuration.
By putting in just a little bit of additional work on the front end, you will save yourself an endless amount of time and aggravation going forward.
How to Setup Your Import Configuration
Step 1: Open the "Configuration Groups" table in your Quickbase application and click the "New Configuration Group" button. (This table will be present if you have already installed EZ File Importer add-on in your application).

Step 2: Enter the name for the Configuration Group and then click on "Save & Close" button.

Step 3: Click on the "Add Import Configuration"

You will now be looking at the following form. We recommend that you Customize the Form to be broken down in 3 tabs for easier consumption (as pictured below).

Tab 1: Type Info

Tab 2: Data Info

Tab 3: Field Mappings

Step 4: Now it's time to Create the Import Configuration. Open up the Excel File that contains the data you want in your Quickbase application.

Step 5: Fill out each of the tabs we created earlier as shown below:
Tab 1: Type Info

*Note - Target Table DBID can be found here:

Tab 2: Data Info

Tab 3: Field Mappings
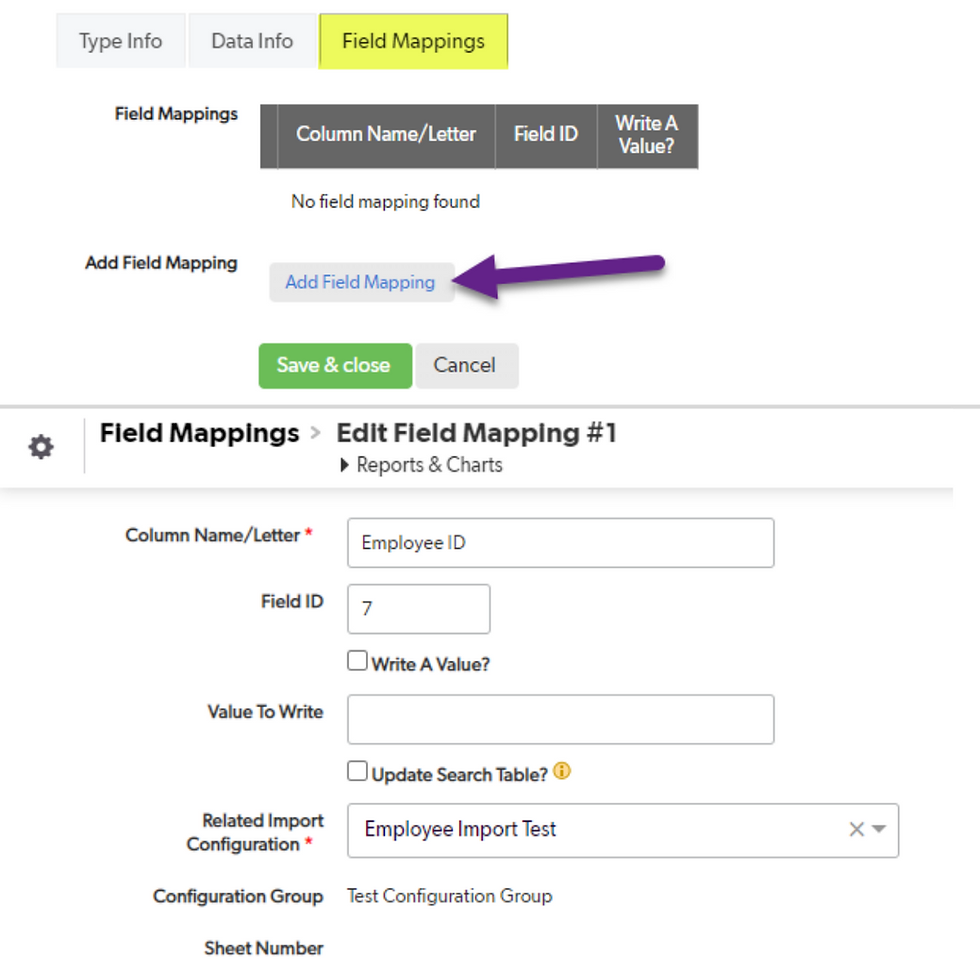
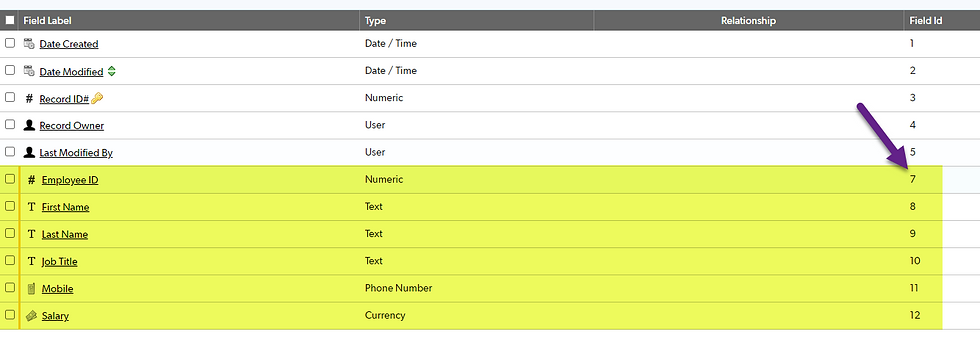
*Note - Field IDs can be found here:
Follow field mapping outline pictured above for all of the remaining fields listed.
When you're done, it should look like the picture below:

Step 6: Set up an email notification on the "Import Files" table to be sent to ezfileimportermultisheet@mail.quickbasetools.com (click here to see how)
This is what triggers our process, so it is an absolutely vital step.
Step 7: Upload and save your file into the "Import Files" Table (shown below):


Step 8: Refresh the page once you save the record

If you've done everything correctly, you'll see import run details added into the record, as well as the properly mapped data imported into your "Employees" table.

In Excel

Want to see how EZ File Importer works for yourself?
Looking to Import Data From Excel Into Your Application?


.png)
Comments